比较火的text-img的模型,看一下其中的模块和流程.
https://course.fast.ai/Lessons/lesson9.html以及The Illustrated Stable Diffusion – Jay Alammar – Visualizing machine learning one concept at a time. (jalammar.github.io)都是比较好的资料.
Overview
stable diffusion前身是latent diffusion[2112.10752] High-Resolution Image Synthesis with Latent Diffusion Models (arxiv.org)
扩散模型已经显示出在生成图像数据方面实现了最先进的结果。但扩散模型的一个缺点是反向去噪过程很慢。此外,这些模型消耗了大量内存,因为它们在像素空间中工作,在生成高分辨率图像时,像素空间变得不合理地昂贵。因此,训练这些模型并将其用于推理是具有挑战性的。
latent diffusion可以通过在低维潜在空间上应用扩散过程而不是使用实际像素空间来降低内存和计算复杂性。这是标准扩散和潜在扩散模型之间的关键区别:在潜在扩散中,模型被训练以生成图像的潜在(压缩)表示
潜在扩散有三个主要成分。 一种自动编码器(VAE),U-Net,text-encoder,例如CLIP的文本编码器。
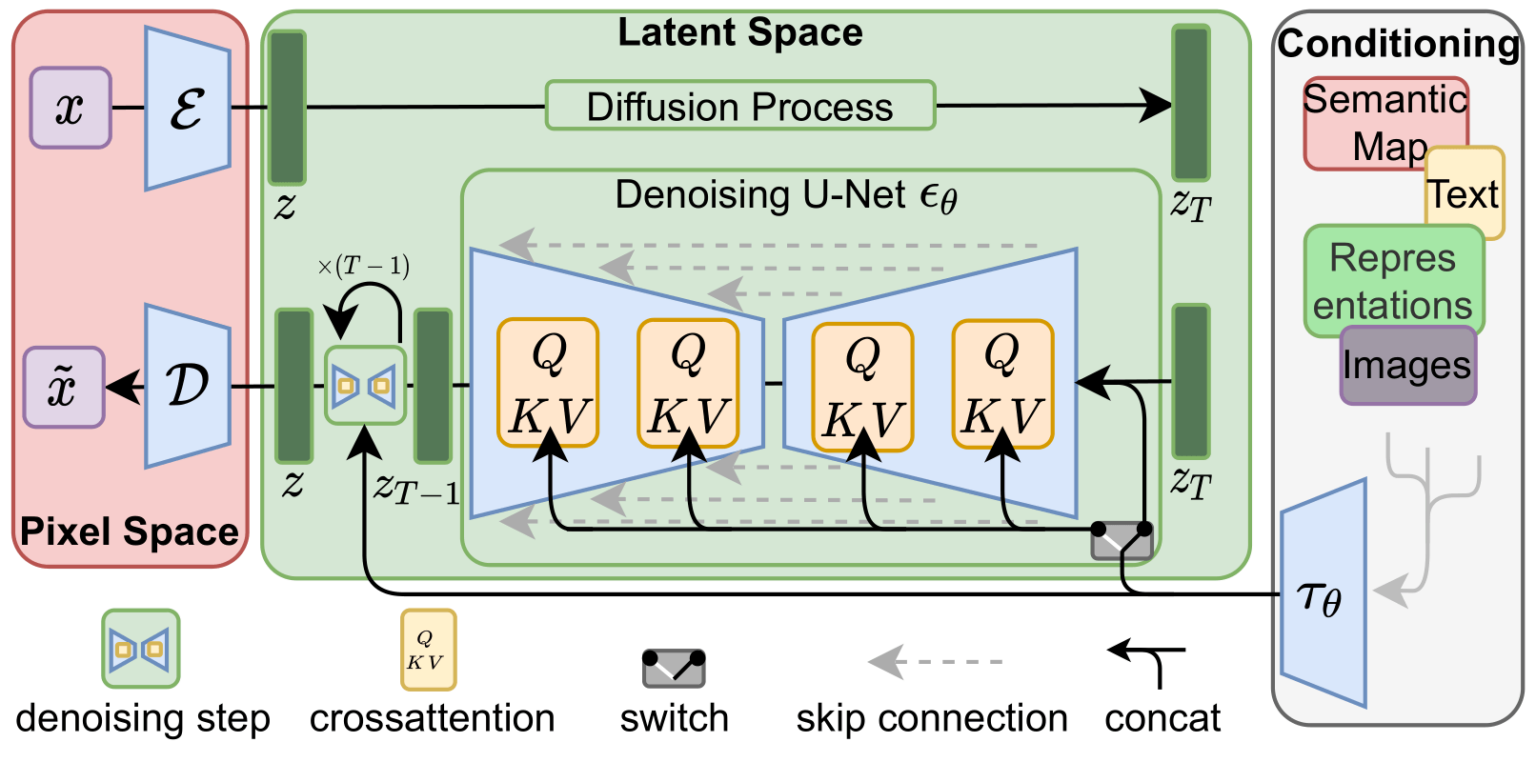
VAE
VAE模型有两个部分,一个编码器和一个解码器。
编码器用于将图像转换为低维的潜在表示,该低维潜在表示将用作U-Net模型的输入。相反,解码器将潜在的表示转换回图像。
在潜在扩散训练期间,编码器用于获得前向扩散过程的图像的潜在表示(latent),前向扩散在每一步应用越来越多的噪声。
在推断过程中,使用VAE解码器将反向扩散过程生成的去噪潜伏时间转换回图像。正如我们将在推理过程中看到的,我们只需要VAE解码器。
U-Net
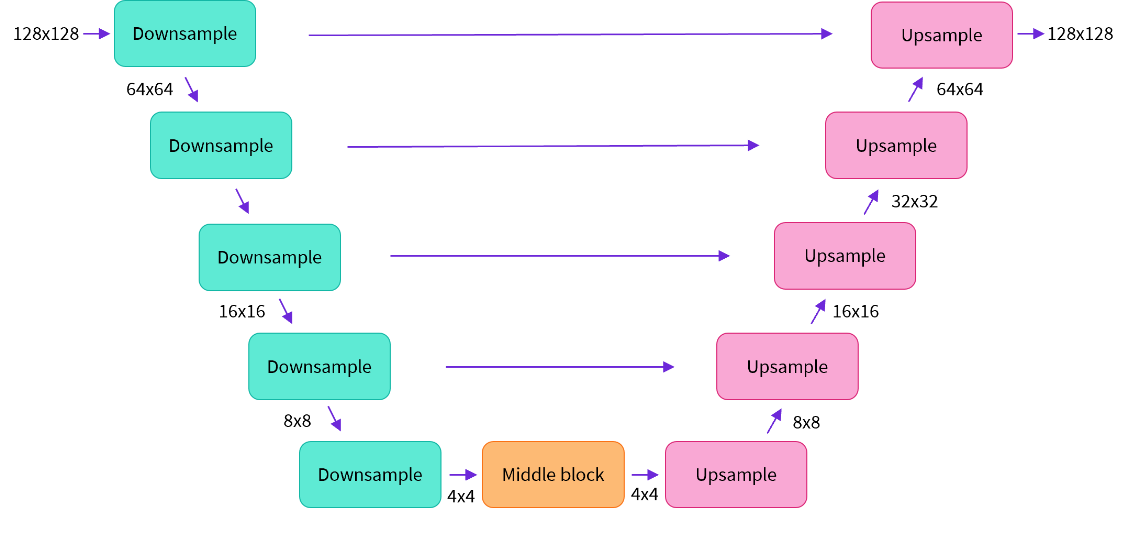
U-Net具有编码器部分和解码器部分,两者都由ResNet块组成。编码器将图像表示压缩成较低分辨率的图像表示,并且解码器将较低分辨率图像表示解码回假定噪声较小的原始较高分辨率图像表示。更具体地,U-Net输出预测可用于计算预测的去噪图像表示的噪声残差。
该体系结构的一些亮点包括:
- 该模型预测与输入大小相同的图像
- 该模型使输入图像经过几个ResNet层块
- 这些层将图像大小减半2然后通过相同数量的块再次对其进行上采样。
- skip connections将下采样路径上的特征链接到上采样路径中的相应层。
为了防止U-Net在下采样时丢失重要信息,通常在编码器的下采样ResNet和解码器的上采样ResNets之间添加short-cut connections。
此外,稳定扩散U-Net能够通过跨注意力层将其输出条件设置在文本嵌入上。交叉注意层被添加到U-Net的编码器和解码器部分,通常在ResNet块之间。
Text-encoder
Text-encoder负责将输入提示(例如“一个骑马的天文数字”)转换为U-Net可以理解的嵌入空间。它通常是一个简单的基于转换器的编码器,将输入token序列映射到潜在文本嵌入序列。
Stable Diffusion在训练期间不训练Text-encoder,而是简单地使用CLIP的已经训练的文本编码器
由于潜在扩散模型的U-Net在低维空间上运行,与像素空间扩散模型相比,它大大降低了内存和计算需求。
diffusion process
扩散过程包括取所需输出大小的随机噪声,并将其通过模型多次。该过程在给定数量的步骤后结束,并且输出图像应该表示根据模型的训练数据分布的样本,例如蝴蝶的图像。
在训练过程中,我们展示了许多给定分布的样本,例如蝴蝶的图像。经过训练后,该模型将能够处理随机噪声,生成类似的蝴蝶图像。
该模型通常不会被训练成直接预测噪声稍低的图像,而是预测“噪声残差”,即噪声较低的图像和输入图像之间的差异(对于称为“DDPM”的扩散模型),或者类似地,两个时间步长之间的梯度(如称为“Score VE”的扩散模式)。也就是说Unet被训练为一个去噪器,被用于输出噪声差异.
因此,为了进行去噪过程,需要一种特定的噪声调度算法,并包裹(wrap)模型,以定义推理需要多少扩散步骤,以及如何从模型的输出中计算噪声较小的图像。扩散器库的不同调度器在这里发挥作用。
在训练时,我们给定text,图像
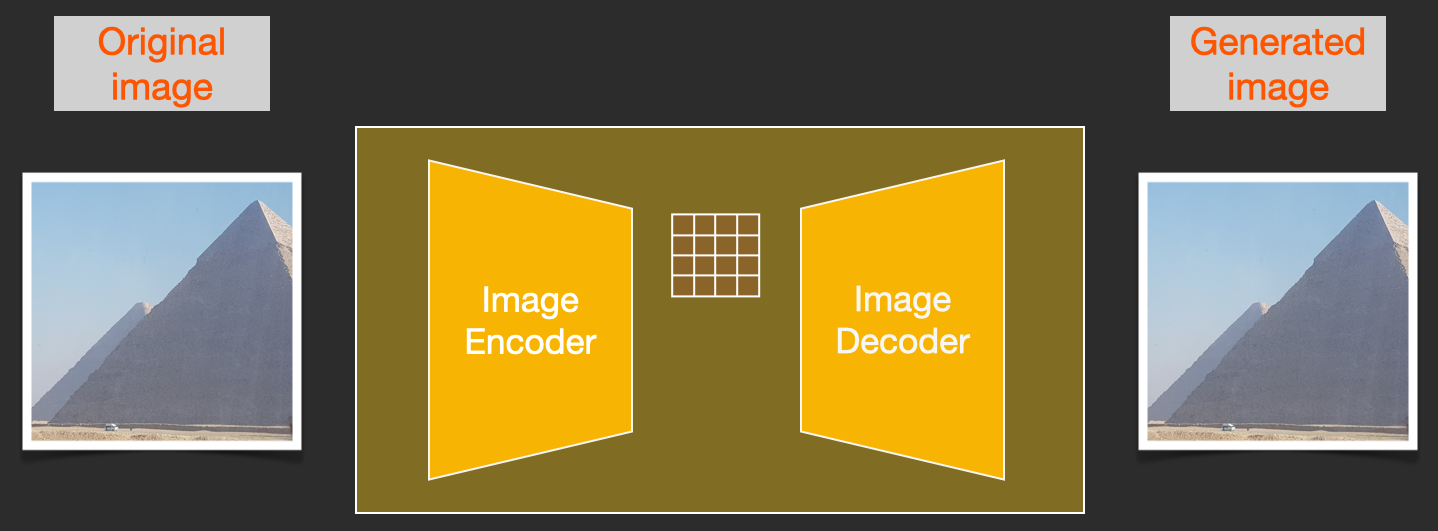
首先将图像通过encoder得到潜在变量用于后续处理,这也是为了内存和计算资源.这种压缩(以及后来的解压缩)是通过自动编码器完成的。自动编码器使用其编码器将图像压缩到潜在空间中,然后使用解码器仅使用压缩信息来重建图像。
现在,正向扩散过程是在压缩的compressed latents上完成的。噪声应用于那些latents的噪声,而不是应用于本身的像素图像的噪声。因此,噪声预测器实际上被训练来预测压缩表示(潜在空间)中的噪声。

正向过程(使用自动编码器的编码器)是我们生成数据以训练噪声预测器的方式。一旦经过训练,我们就可以通过运行反向过程(使用自动编码器的解码器)来生成图像。
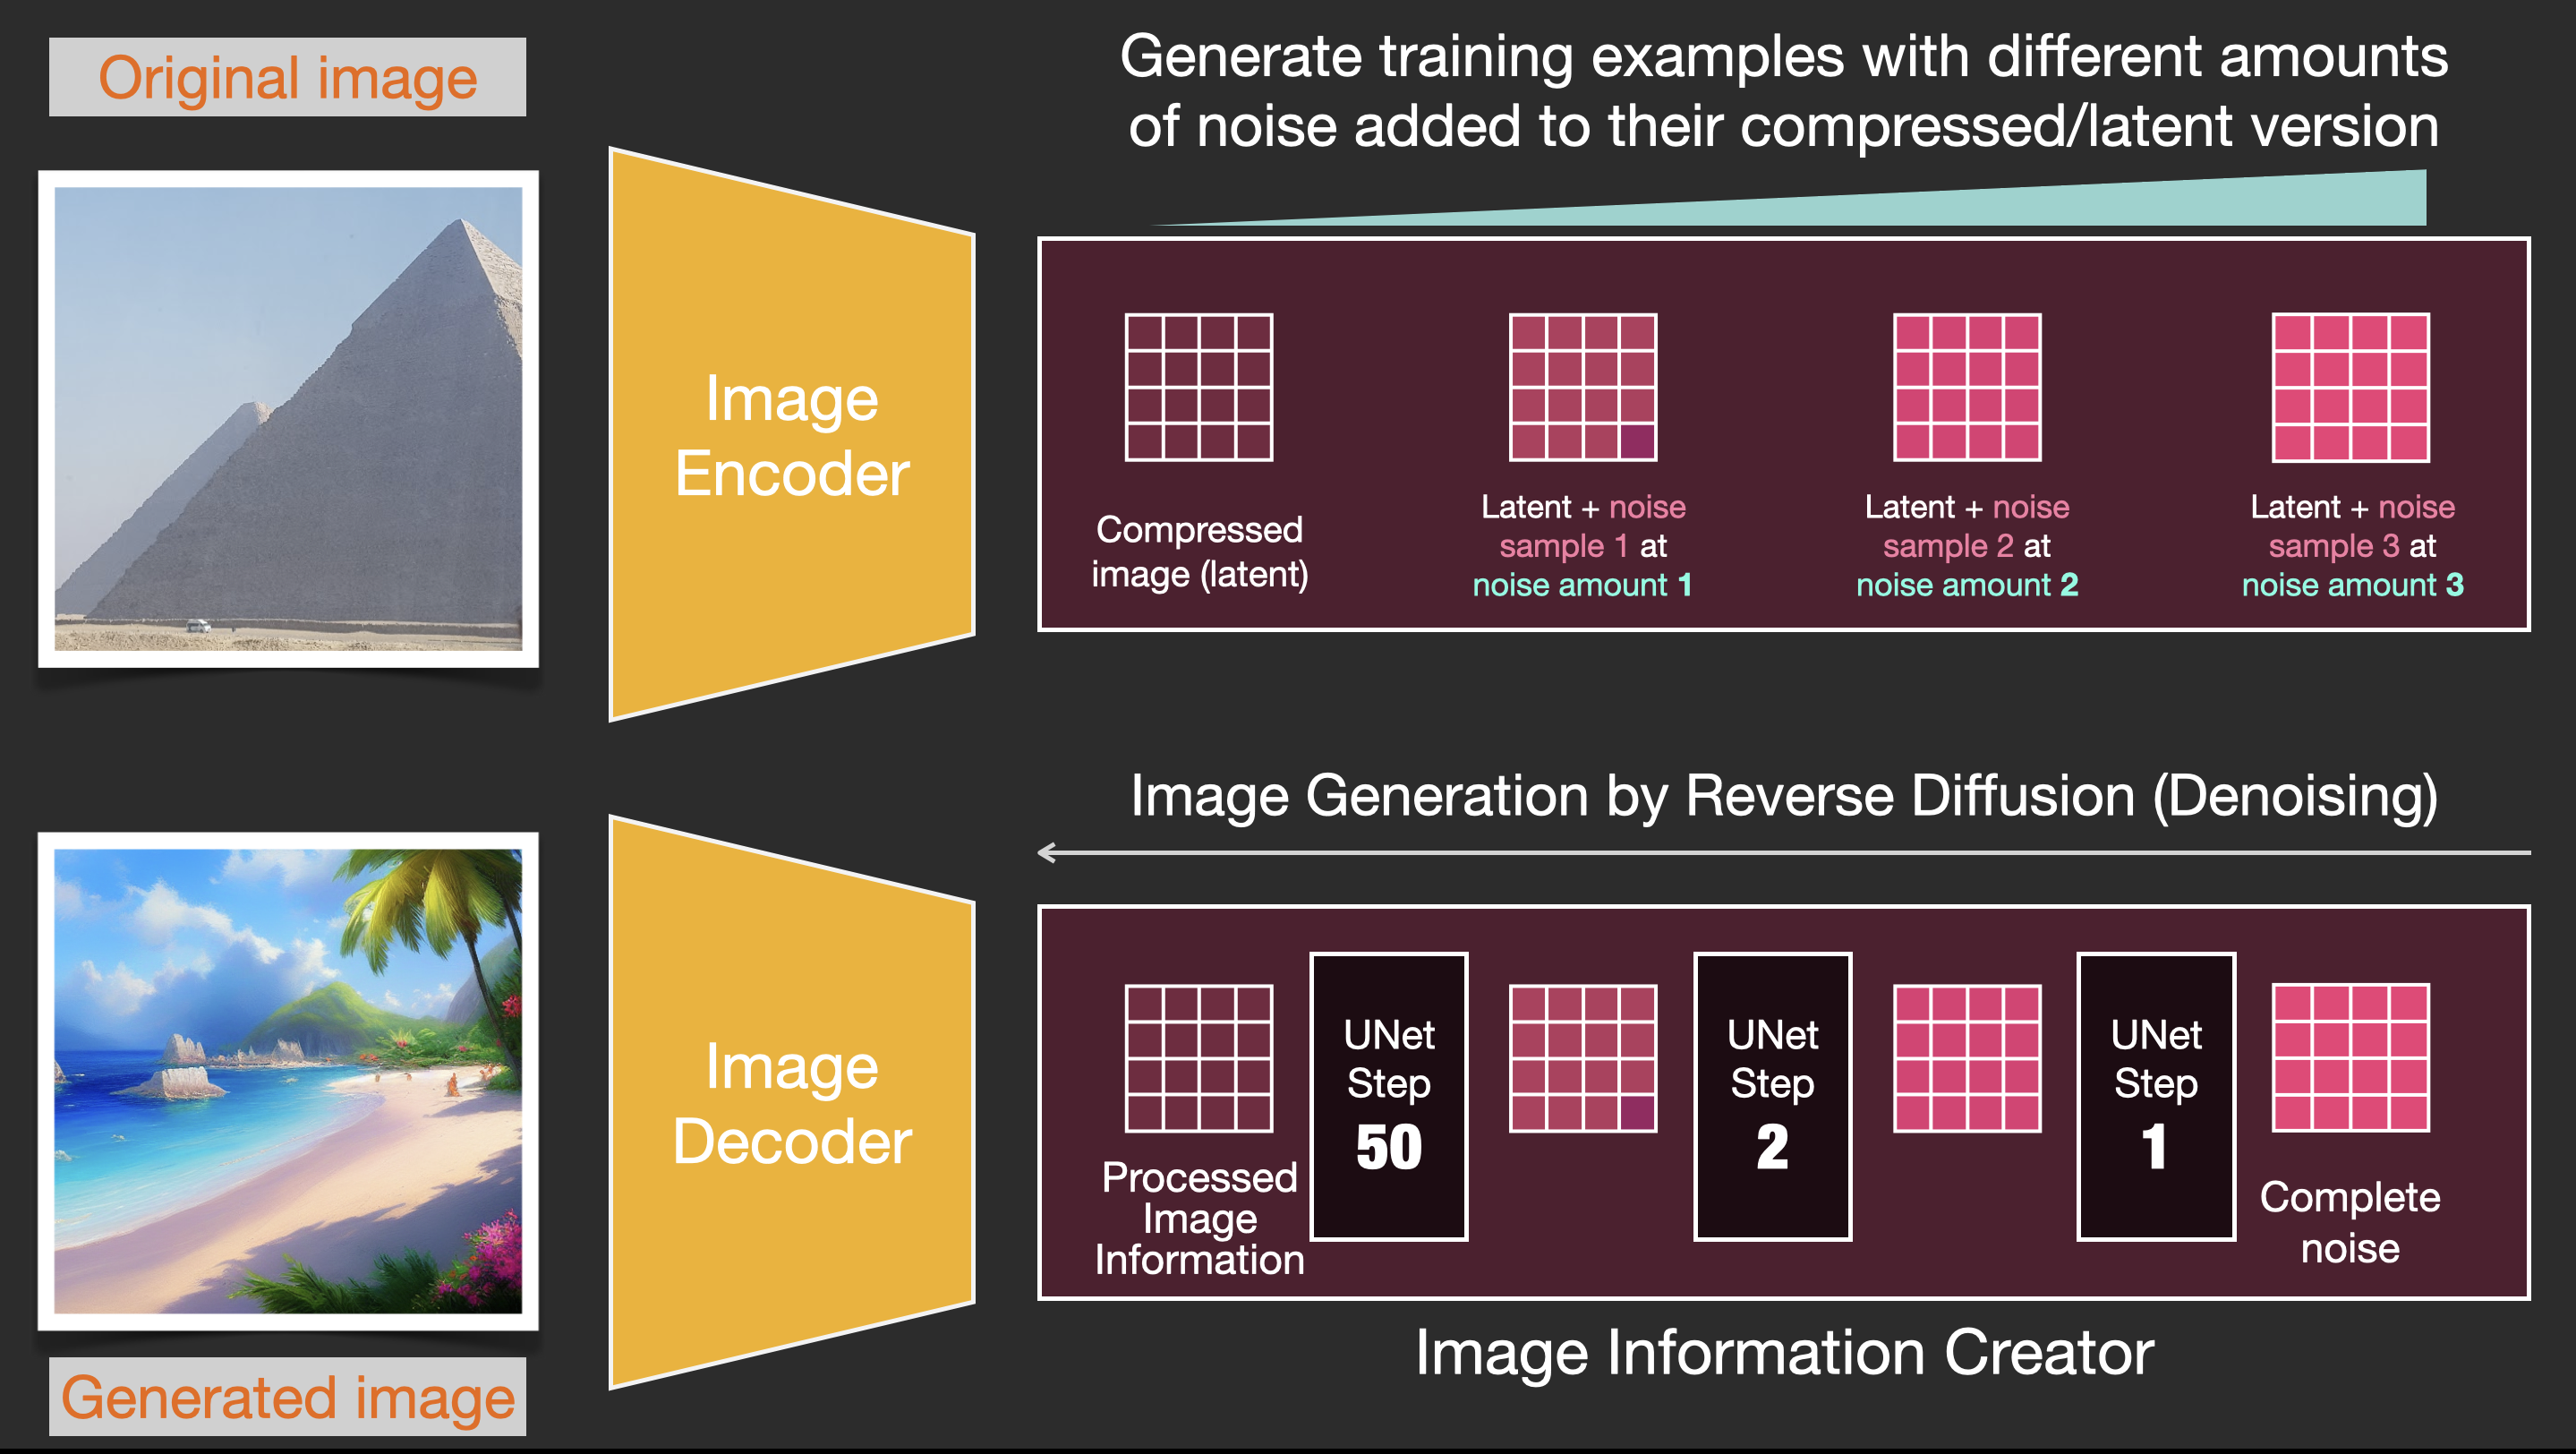
通过一张图片(潜在变量)以及添加与一个值(noise amount)相关的噪声,得到新的数据.
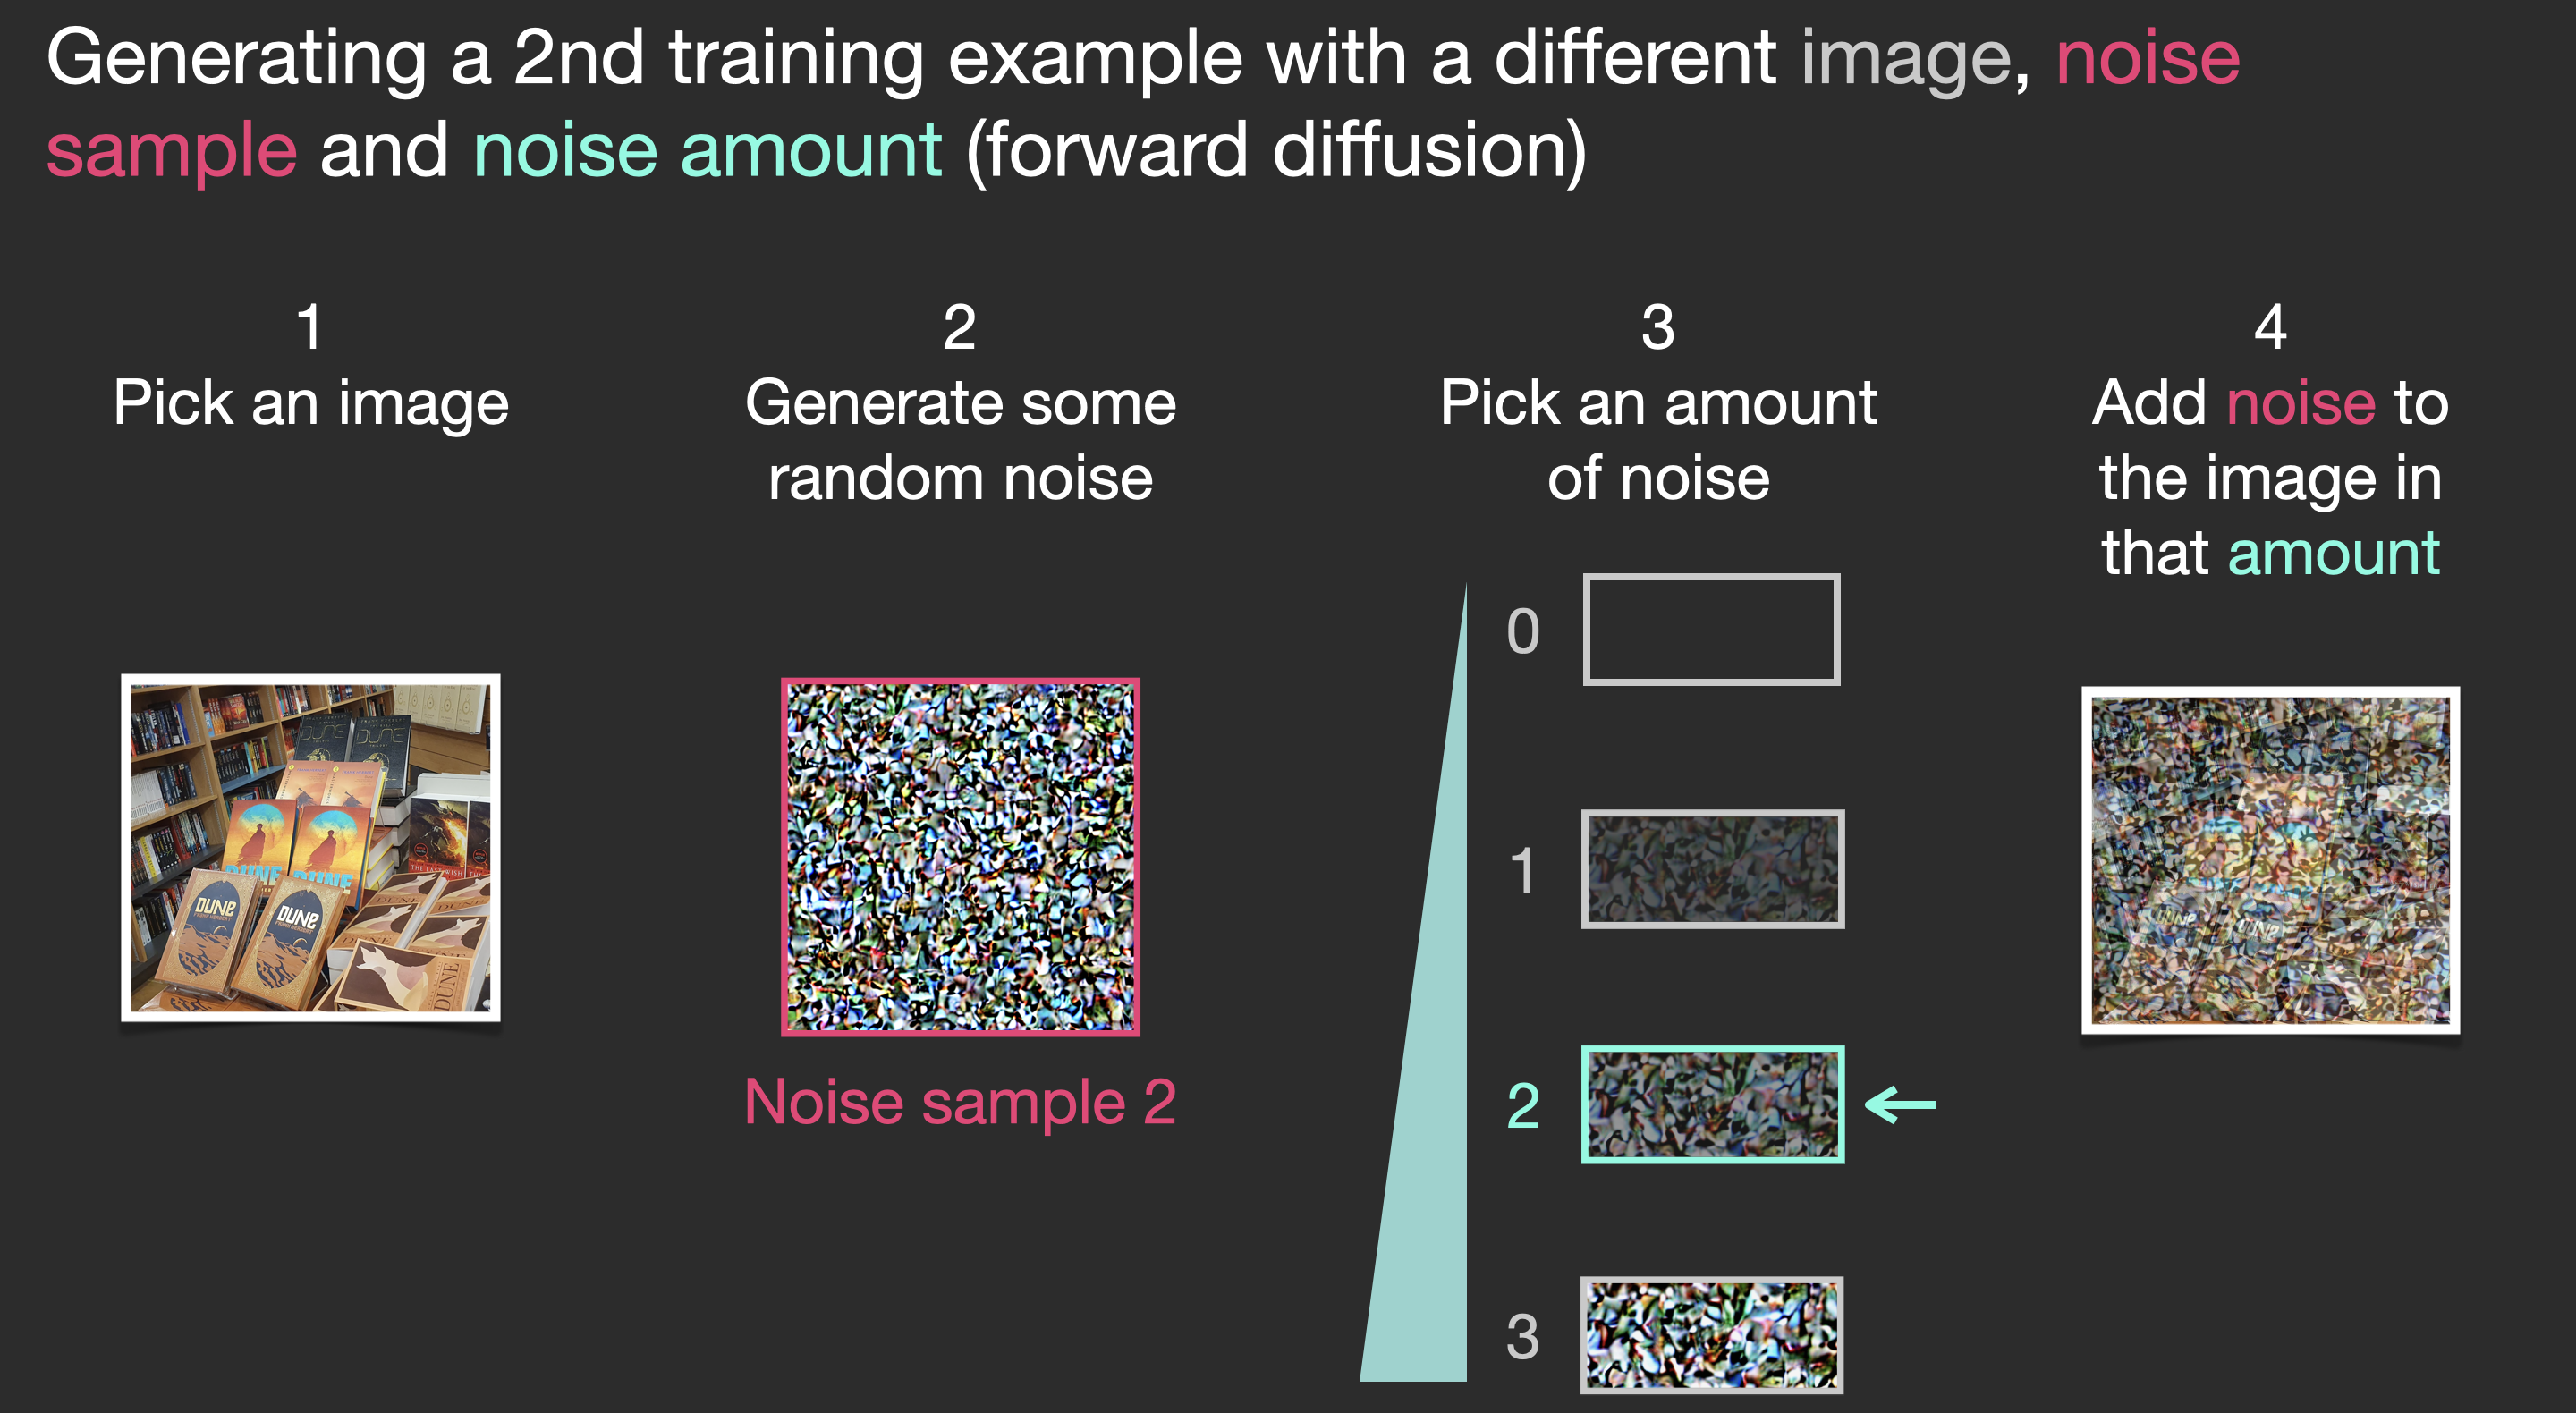
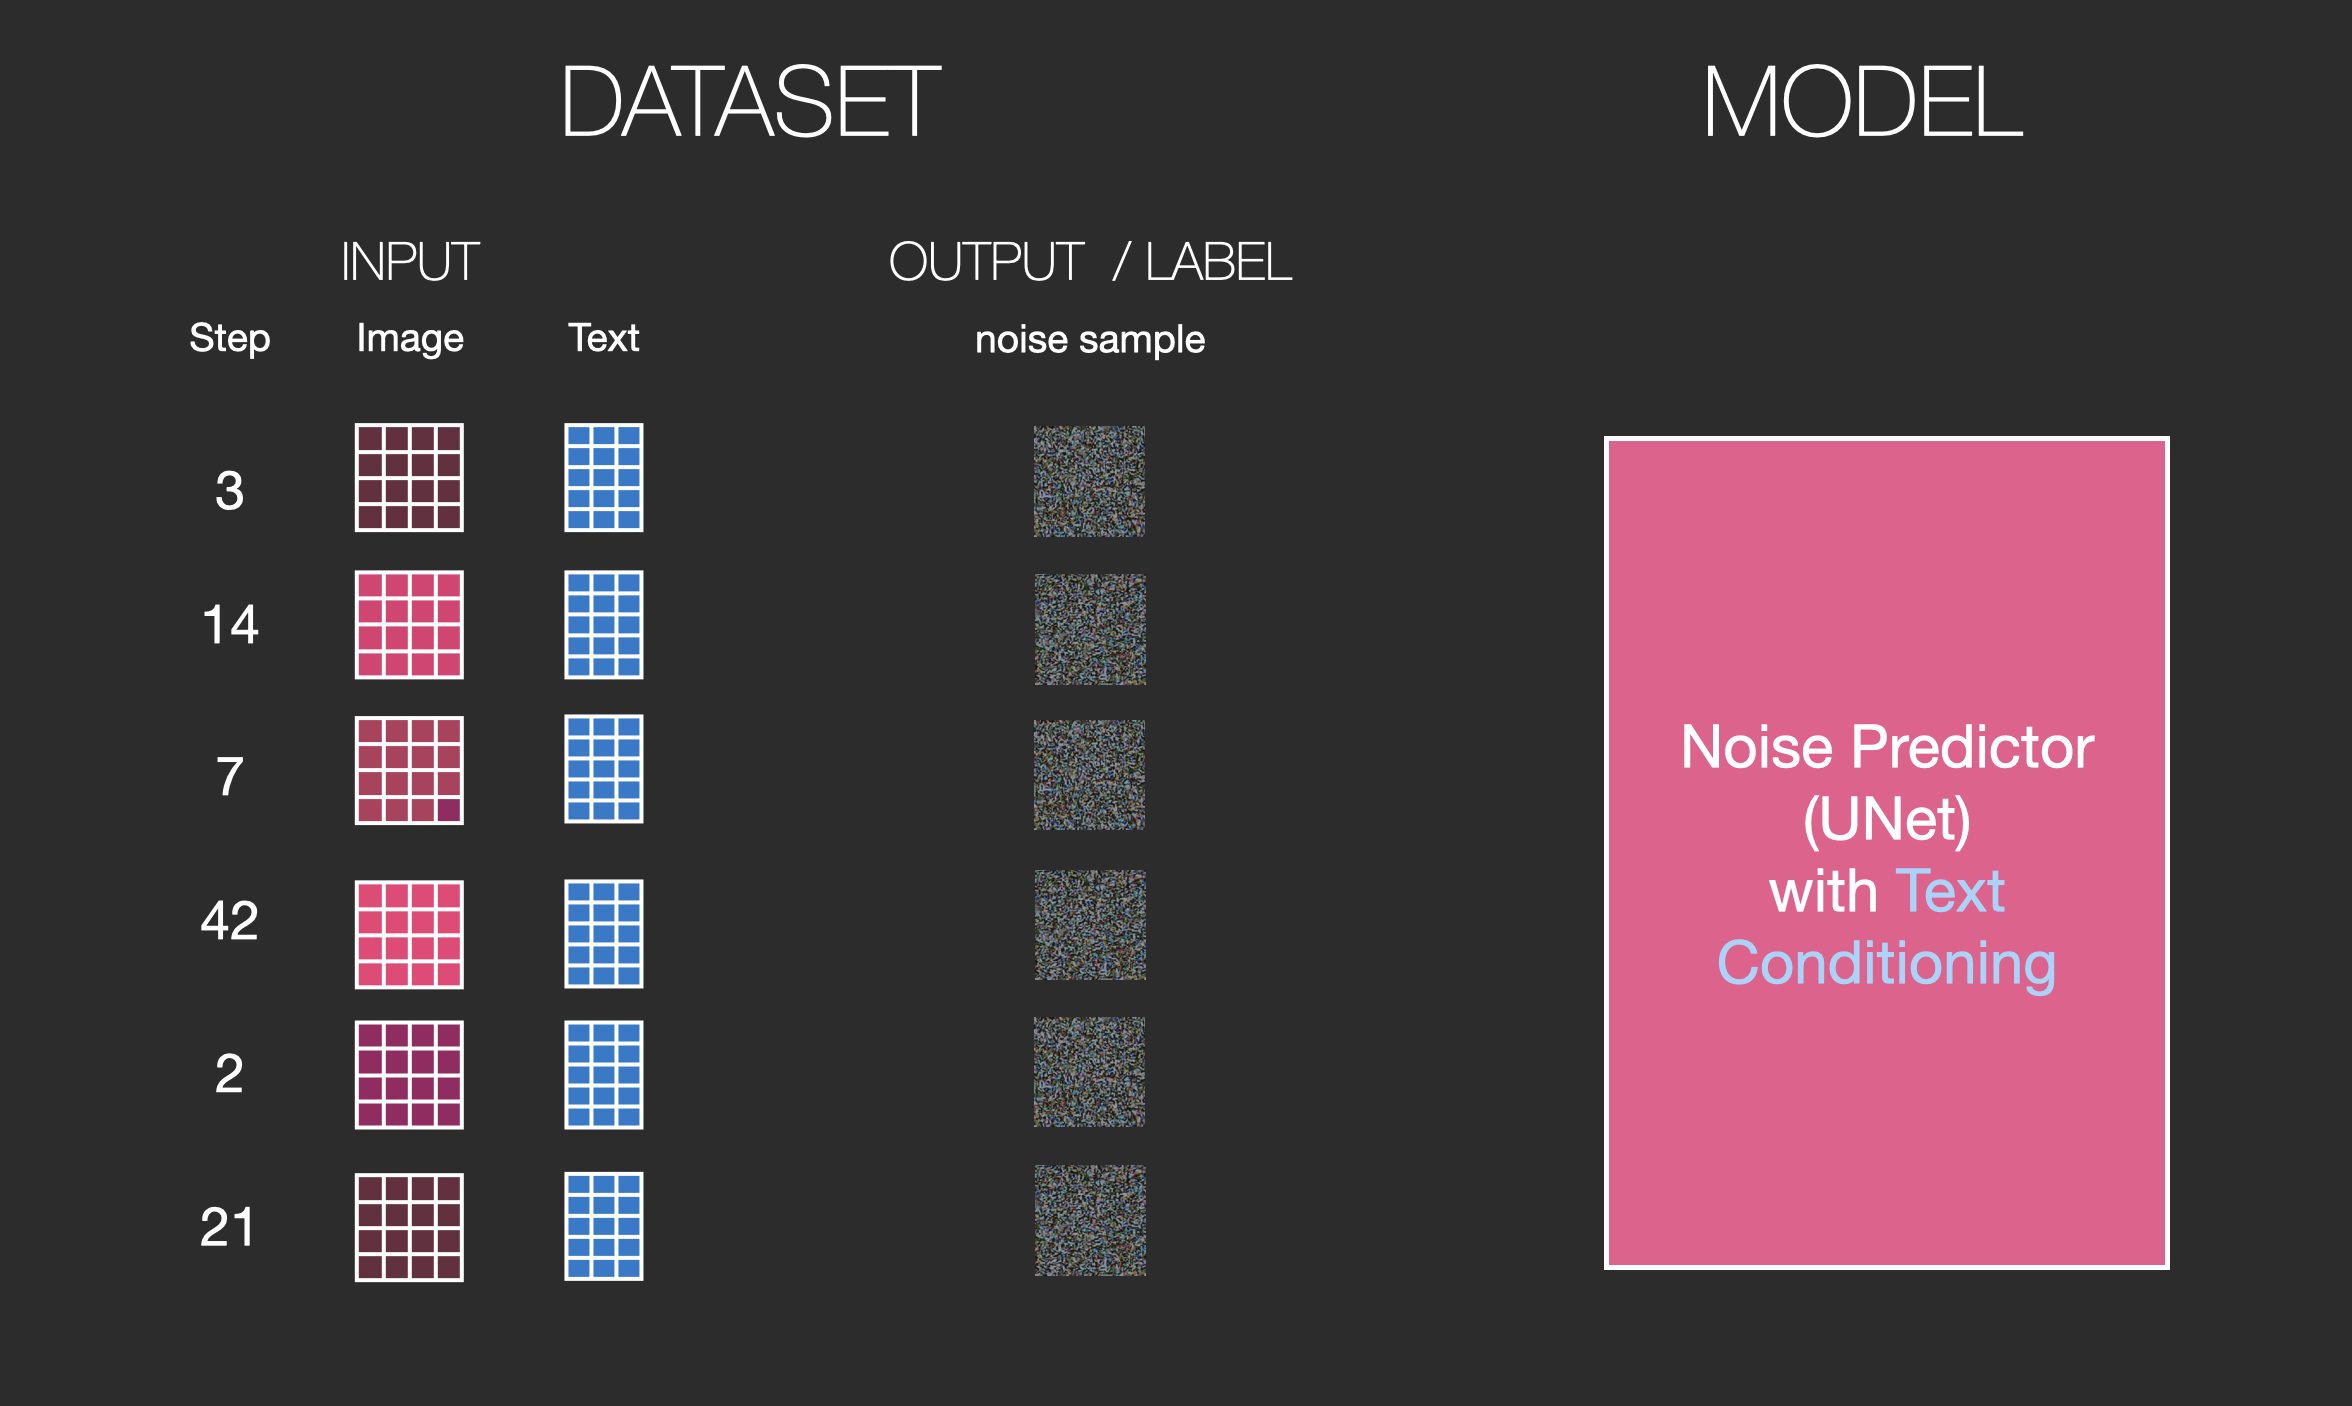
有了这个数据集,我们可以训练噪声预测器,并最终获得一个出色的噪声预测器。当在特定配置下运行时,它实际上可以创建图像
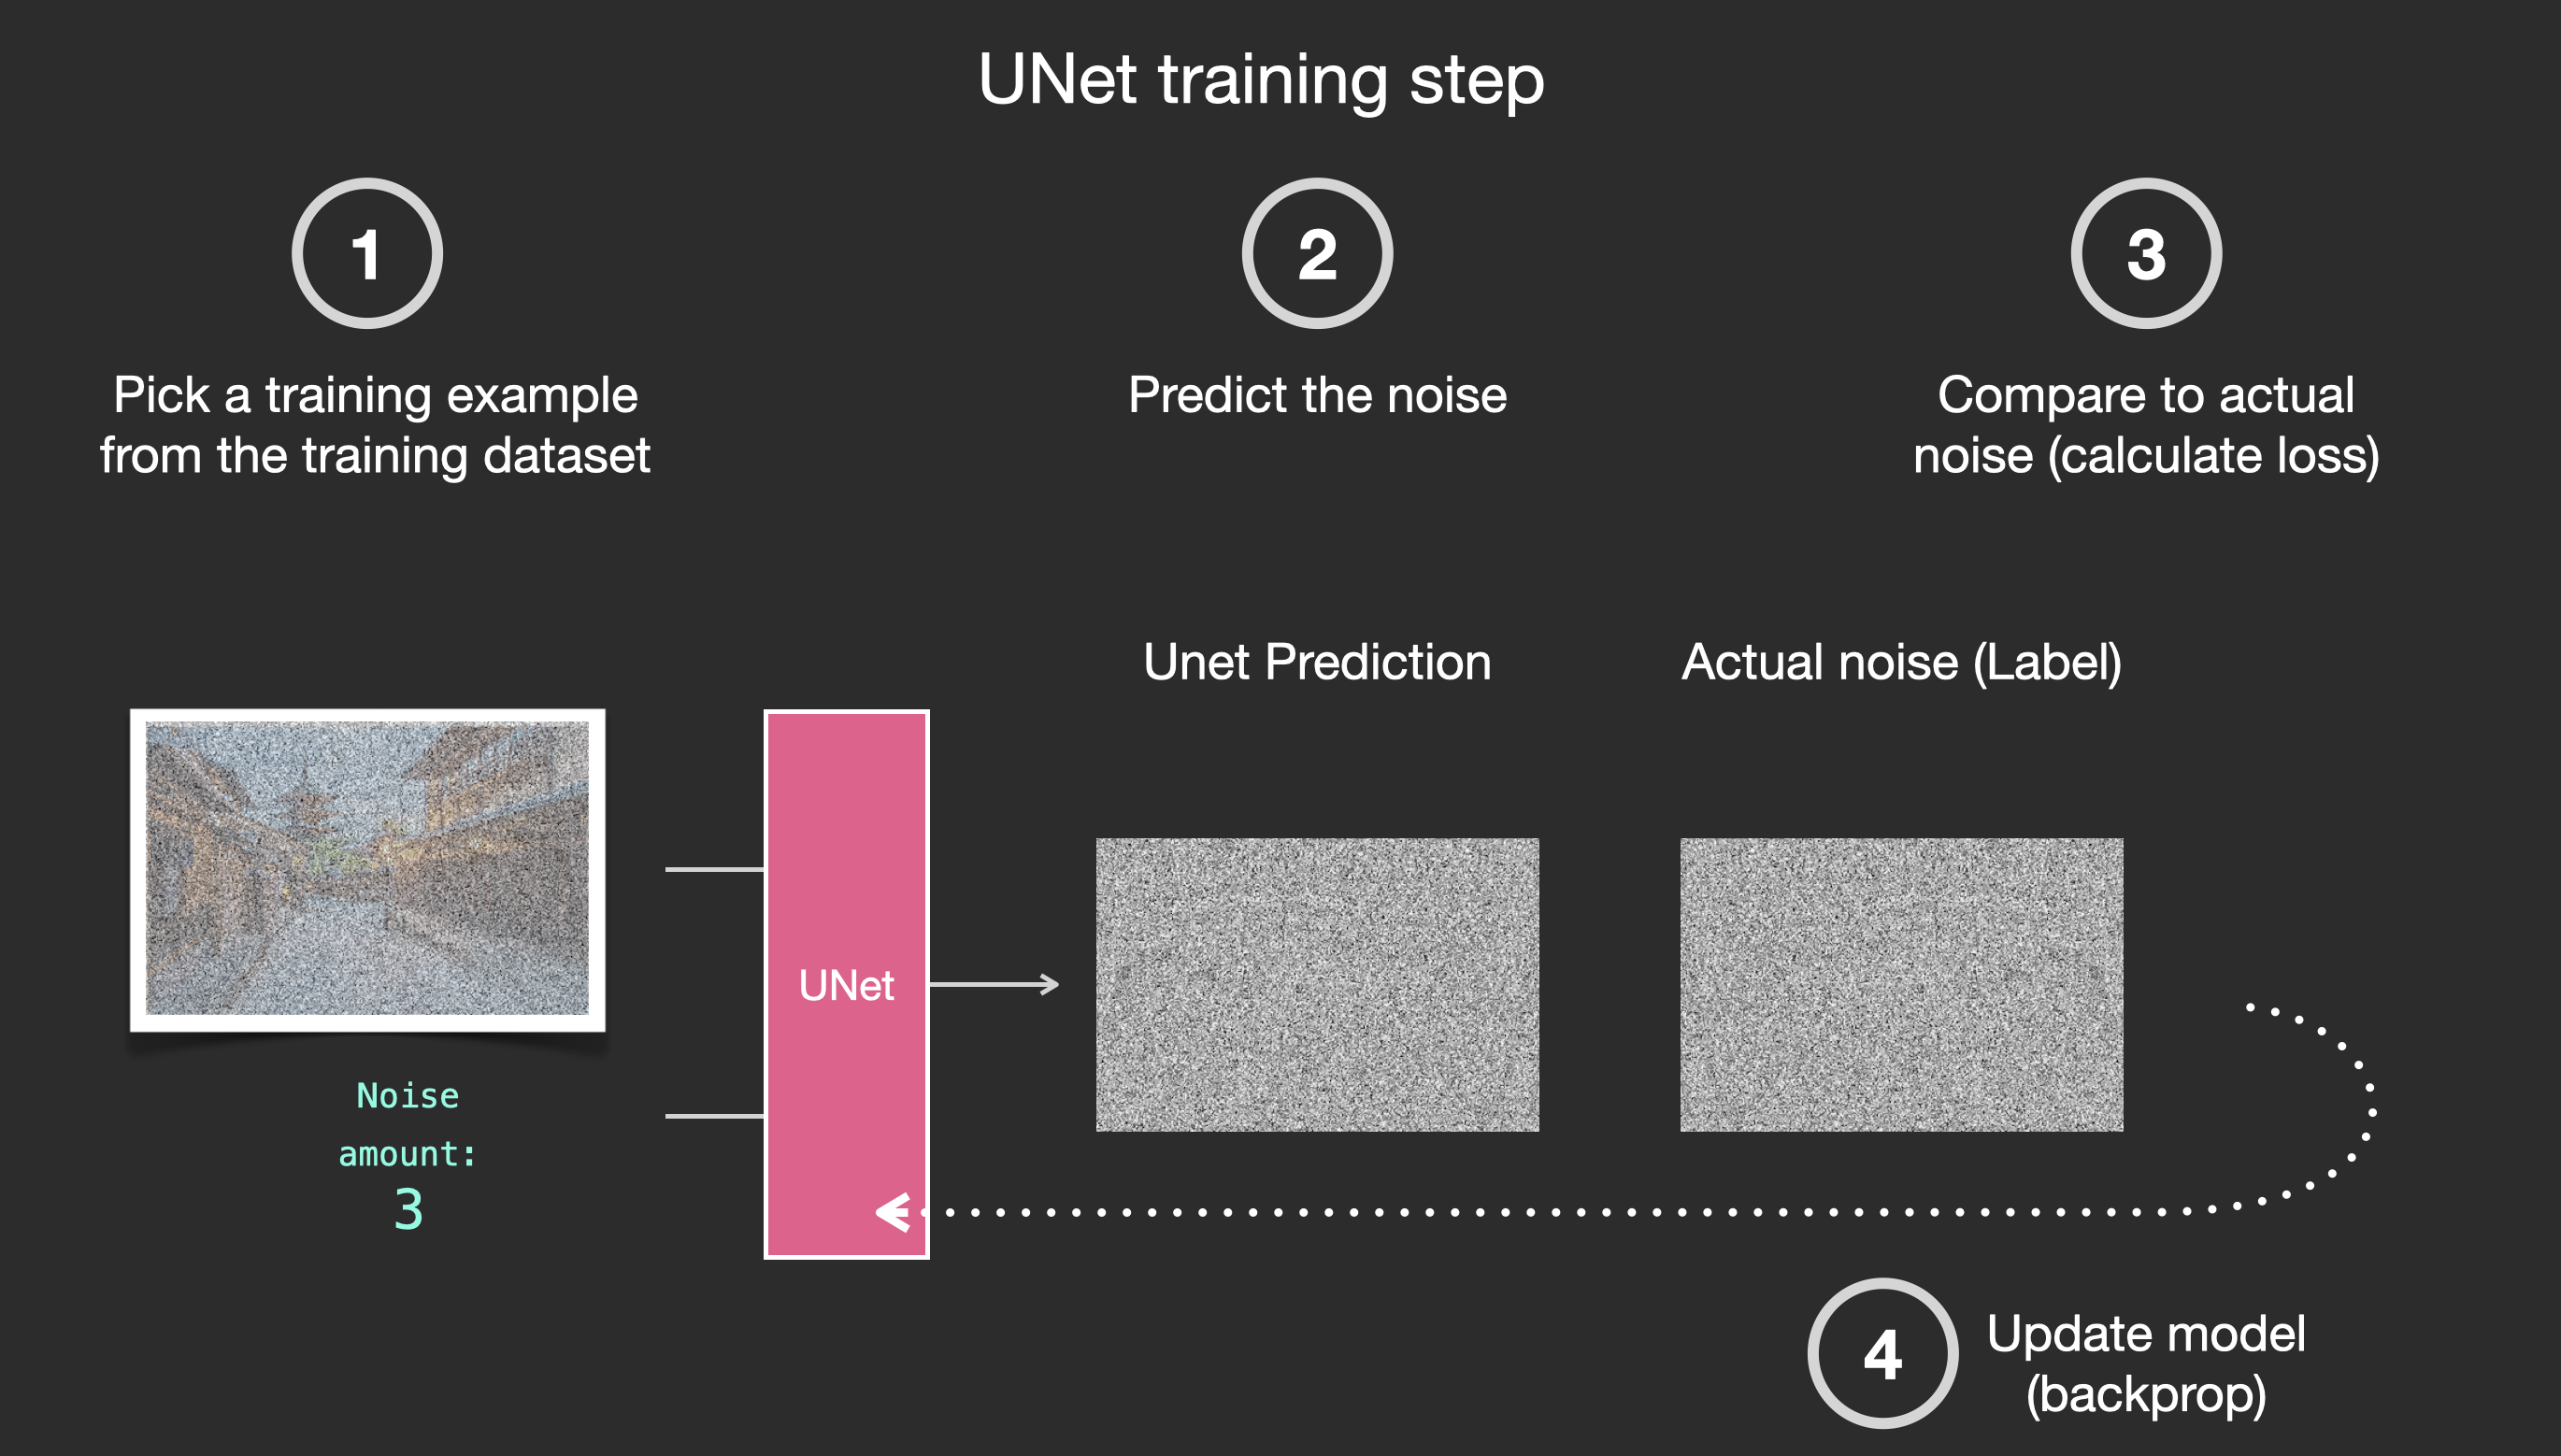
我们目的是得到一个噪声预测器,通过之前得到的带有噪声的图像数据集以及相应的加噪声的值,这个预测器将这些作为输入,输出就是噪声,将带噪声图像数据集减去噪声看是否与原图一样,这样就得到一个noise predictor.

Dall-E2和谷歌的Imagen也是类似原理.
注意上面的输入并没有加入text embedding,Transformer语言模型被用作语言理解组件,该组件接受文本提示并生成 token embeddings。发布的stable diffusion使用ClipText(一种基于GPT的模型),而论文中使用的BERT。
CLIP训练
CLIP是在图像及其字幕的数据集上进行训练的。想象一下这样的数据集,只有4亿张图像和它们的标题(captions)
事实上,CLIP是根据从网络上抓取的图像及其“alt”标签进行训练的。
CLIP是图像编码器和文本编码器的组合。它的训练过程可以简化为拍摄图像及其说明(caption)。我们分别用图像和文本编码器对它们进行编码。
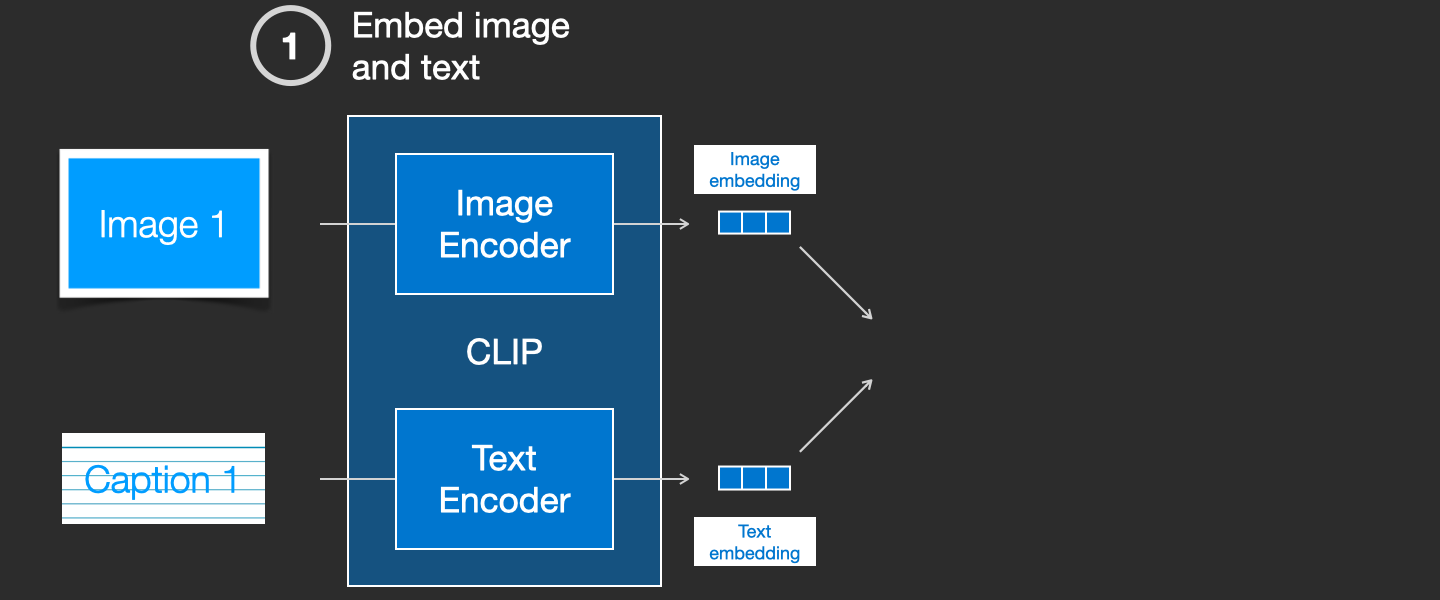
然后,我们使用余弦相似性来比较结果嵌入。当我们开始训练过程时,即使文本正确地描述了图像,相似度也会很低。我们更新这两个模型,以便下次嵌入它们时,得到的嵌入是相似的。
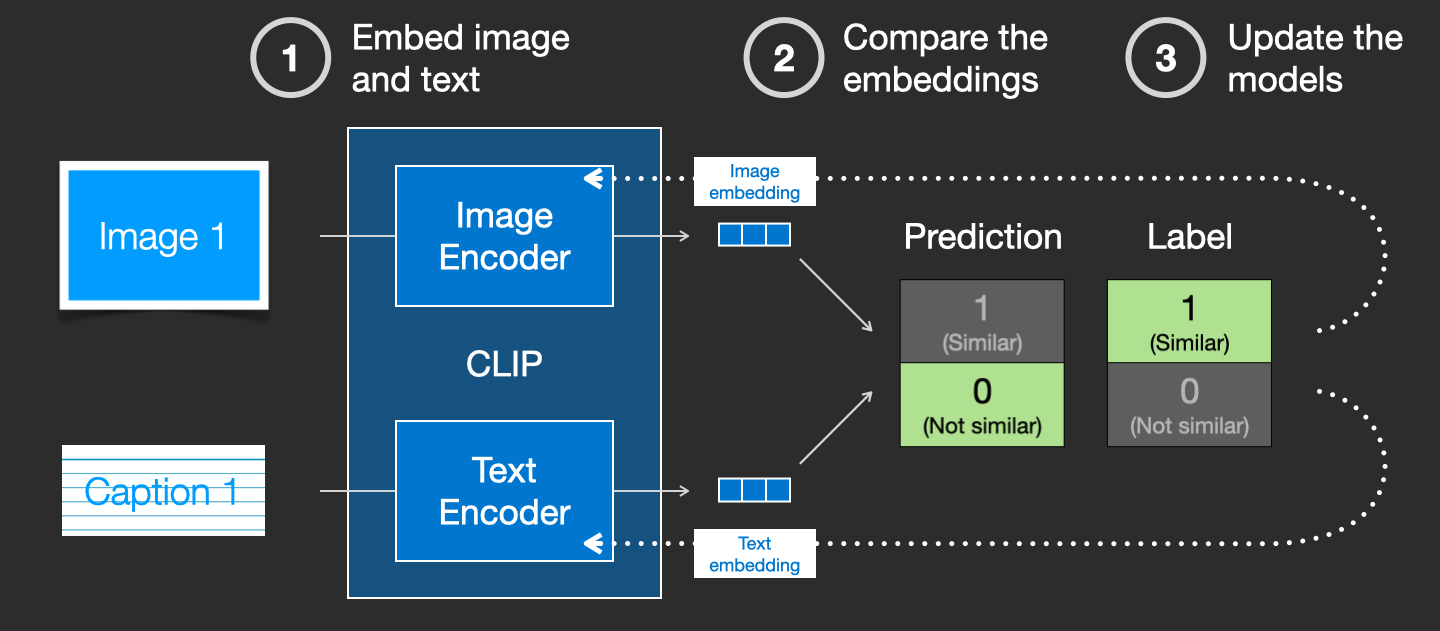
通过在数据集中重复,并使用大批量,我们最终发现编码器能够生成狗的图像和句子“狗的照片”相似的嵌入。就像在word2vec中一样,训练过程也需要包括不匹配的图像和描述(captions )的负面示例,并且模型需要为它们分配低相似度分数。
captions本身是字幕的意思,这里表示图像的类似标签,标题,名字的含义.
加入text信息
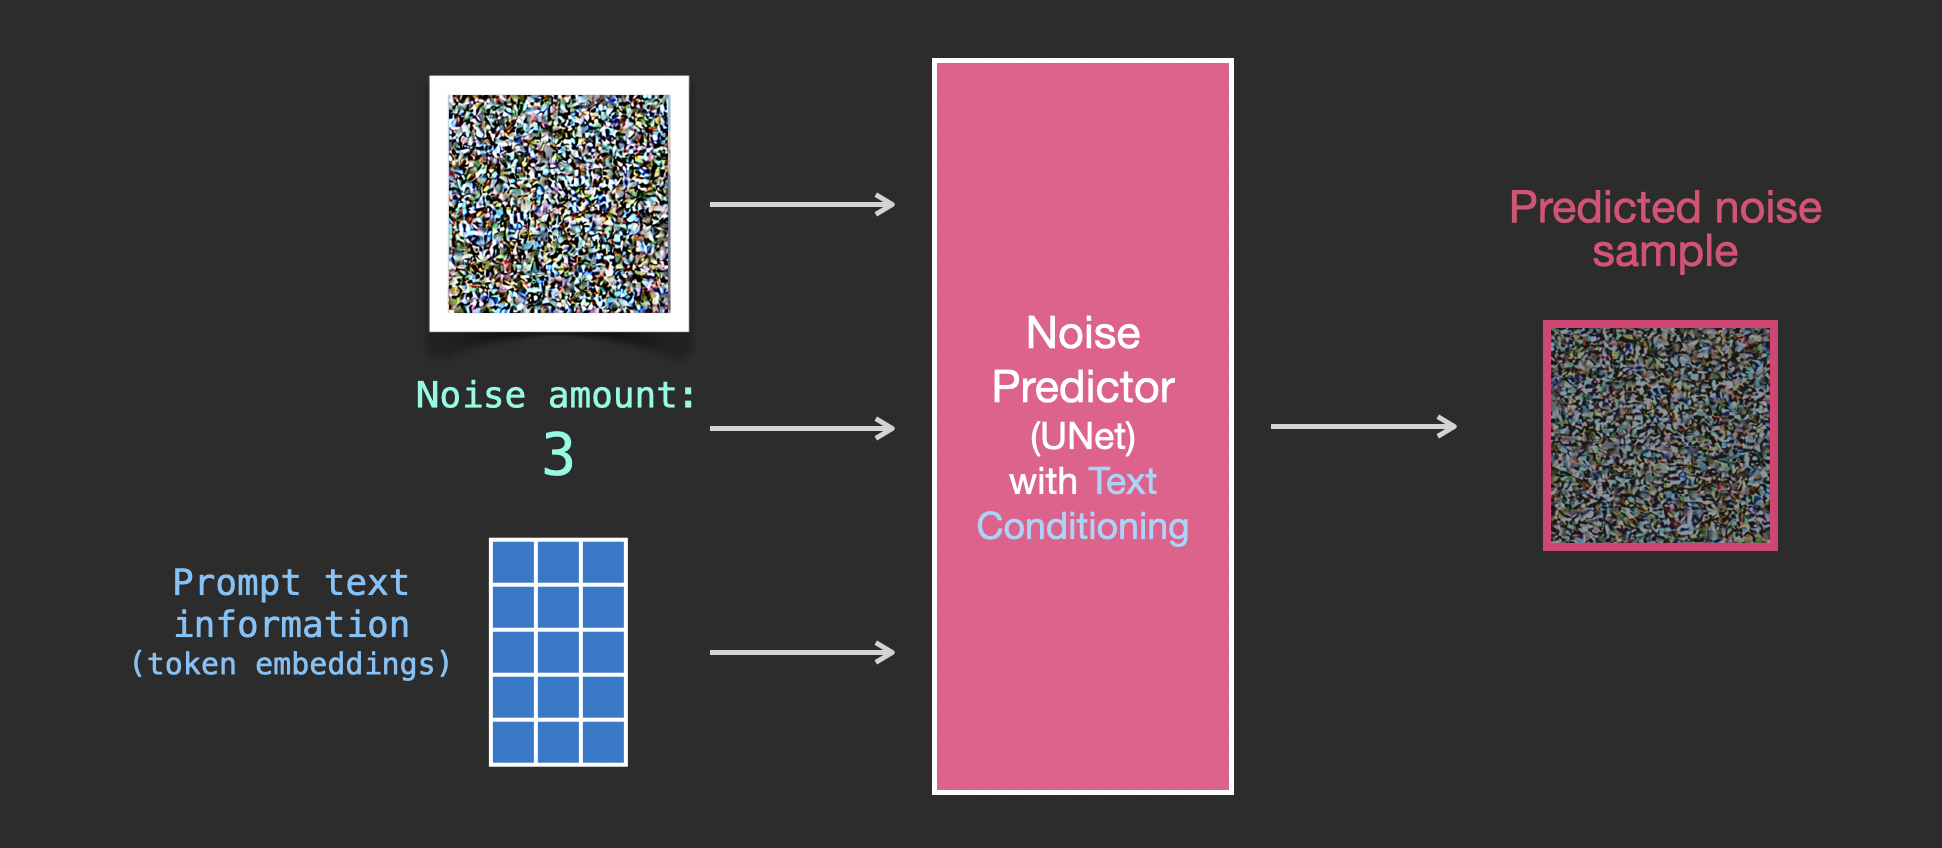
为了使文本成为图像生成过程的一部分,我们必须调整我们的噪声预测器,以使用文本作为输入。
现在的数据集包括编码文本。由于我们在潜在空间中操作,输入图像和预测噪声都在潜在空间内。
如果不包含text信息
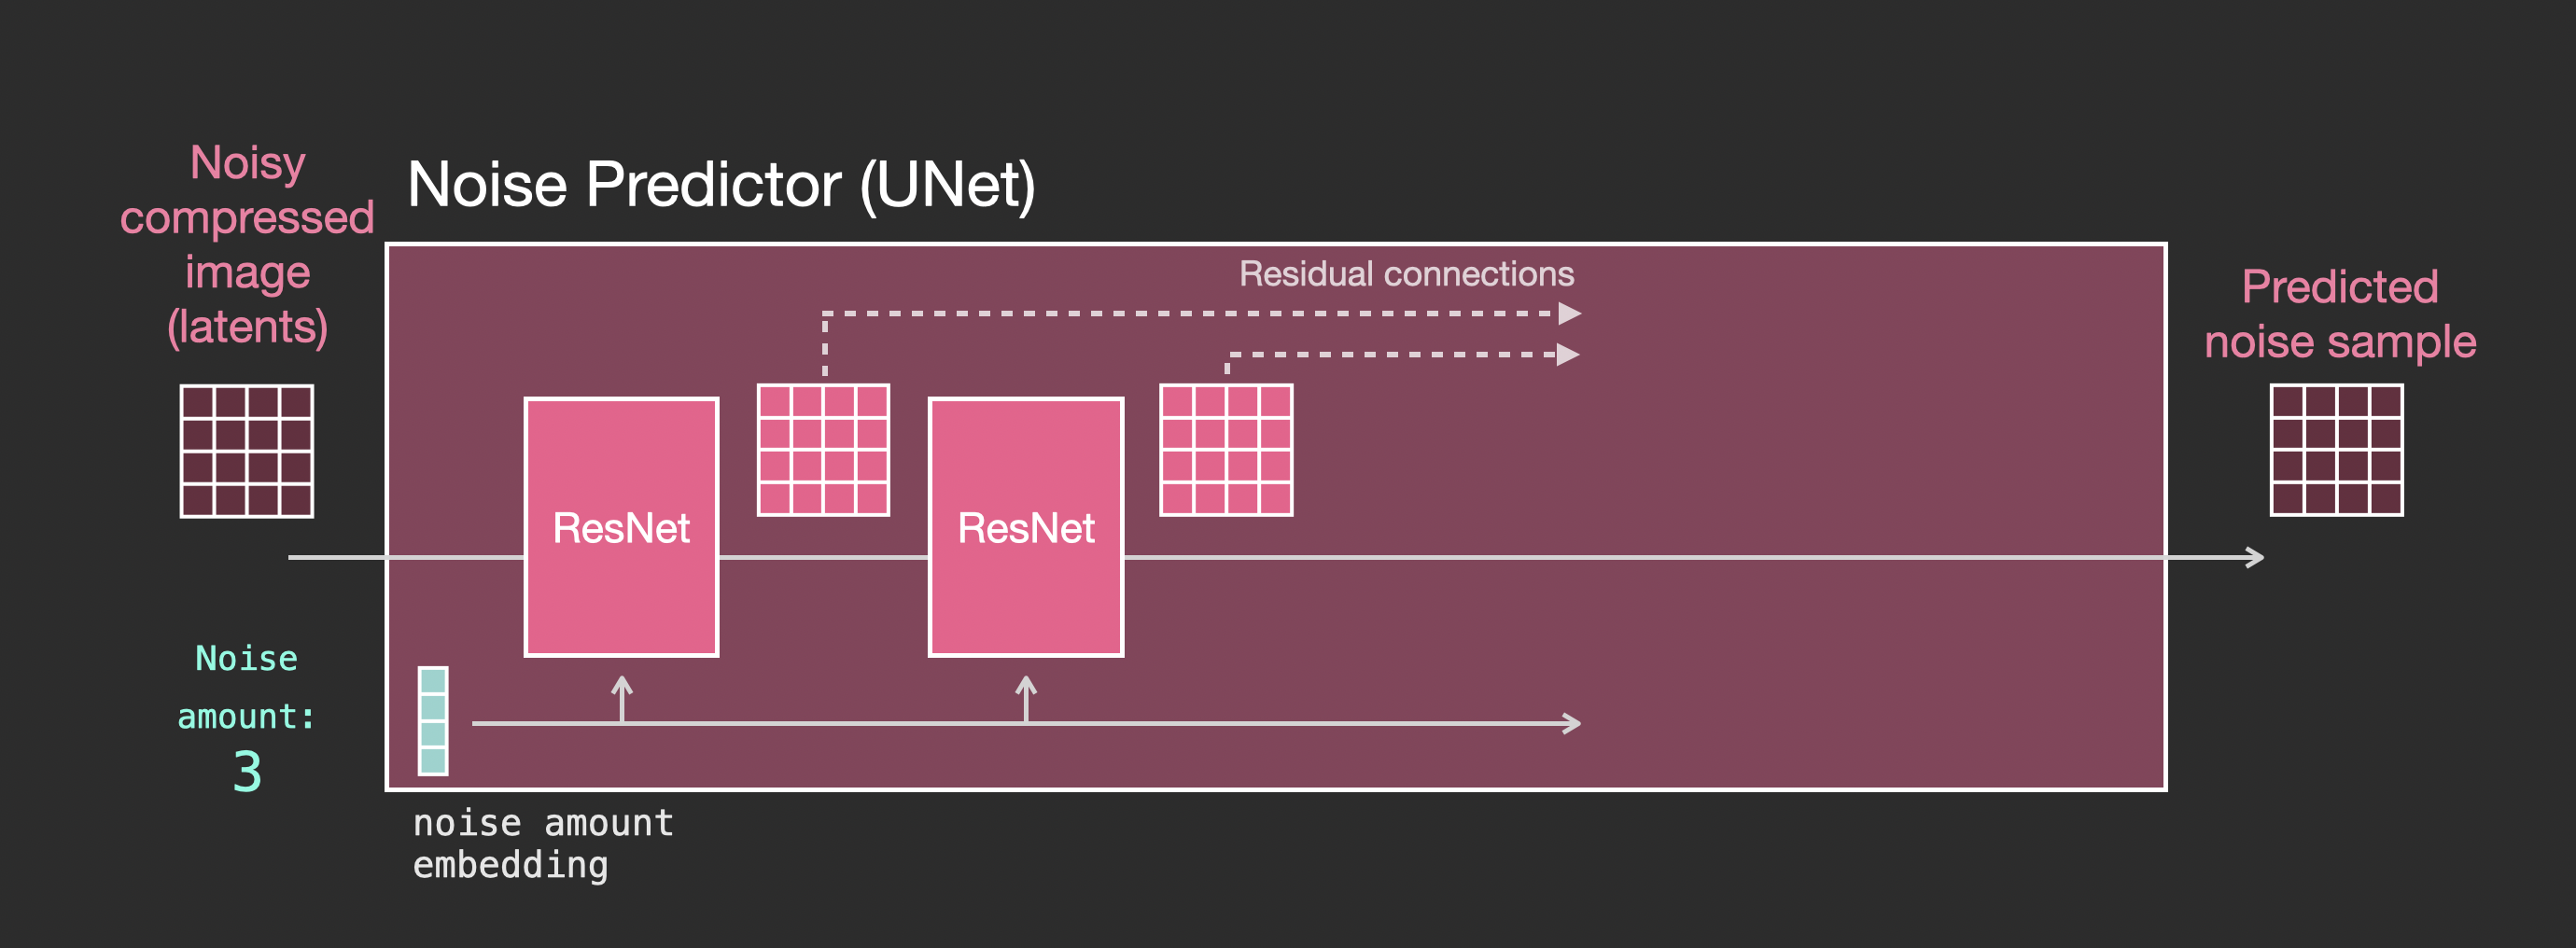
在Unet中,如果没有text信息,那么结构如下

- Unet是一系列用于转换latents数组的层
- 每个层对上一层的输出进行操作
- 一些输出(通过residual connections)被馈送到网络中稍后的处理中
- 时间步长(timestep)被转换为时间步长嵌入向量( time step embedding vector),
如果包含text信息
需要对结构进行的主要更改是在ResNet块之间添加一个注意力层,以添加对文本输入的支持。

请注意,ResNet块不会直接查看文本。但注意力层将这些文本表示合并到了latents中。现在,下一个ResNet可以在处理过程中利用合并的文本信息。
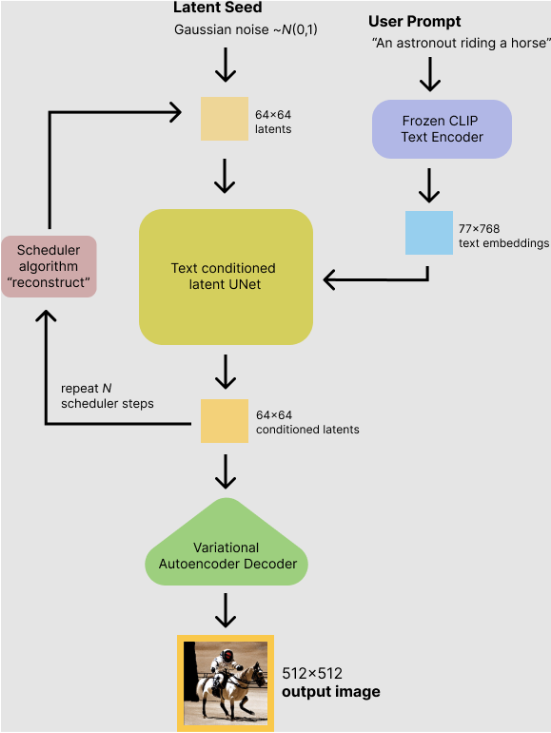
Stable Diffusion during inference
训练时通过一个prompt,也就是text文本,然后通过一个laten seed随机生成一个潜变量图像(正态分布噪声),这些作为unet的输入
代码如下,使用hugging face的diffusers库.
import torch
torch_device = "cuda" if torch.cuda.is_available() else "cpu"
from transformers import CLIPTextModel, CLIPTokenizer
from diffusers import AutoencoderKL, UNet2DConditionModel, PNDMScheduler

# 1. Load the autoencoder model which will be used to decode the latents into image space.
vae = AutoencoderKL.from_pretrained("CompVis/stable-diffusion-v1-4", subfolder="vae")

# 2. Load the tokenizer and text encoder to tokenize and encode the text.
tokenizer = CLIPTokenizer.from_pretrained("openai/clip-vit-large-patch14")
text_encoder = CLIPTextModel.from_pretrained("openai/clip-vit-large-patch14")

# 3. The UNet model for generating the latents.
unet = UNet2DConditionModel.from_pretrained("CompVis/stable-diffusion-v1-4", subfolder="unet")
from diffusers import LMSDiscreteScheduler

scheduler = LMSDiscreteScheduler.from_pretrained("CompVis/stable-diffusion-v1-4", subfolder="scheduler")
vae = vae.to(torch_device)
text_encoder = text_encoder.to(torch_device)
unet = unet.to(torch_device)
prompt = ["a photograph of an astronaut riding a horse"]

height = 512                        # default height of Stable Diffusion
width = 512                         # default width of Stable Diffusion

num_inference_steps = 100            # Number of denoising steps

guidance_scale = 7.5                # Scale for classifier-free guidance

generator = torch.manual_seed(32)   # Seed generator to create the inital latent noise

batch_size = 1
text_input = tokenizer(prompt, padding="max_length", max_length=tokenizer.model_max_length, truncation=True, return_tensors="pt")

with torch.no_grad():
  text_embeddings = text_encoder(text_input.input_ids.to(torch_device))[0]
  max_length = text_input.input_ids.shape[-1]
uncond_input = tokenizer(
    [""] * batch_size, padding="max_length", max_length=max_length, return_tensors="pt"
)
with torch.no_grad():
  uncond_embeddings = text_encoder(uncond_input.input_ids.to(torch_device))[0]
  text_embeddings = torch.cat([uncond_embeddings, text_embeddings])
  latents = torch.randn(
  (batch_size, unet.in_channels, height // 8, width // 8),
  generator=generator,
)
latents = latents.to(torch_device)
scheduler.set_timesteps(num_inference_steps)
latents = latents * scheduler.init_noise_sigma

from tqdm.auto import tqdm
from torch import autocast

for t in tqdm(scheduler.timesteps):
  # expand the latents if we are doing classifier-free guidance to avoid doing two forward passes.
  latent_model_input = torch.cat([latents] * 2)

  latent_model_input = scheduler.scale_model_input(latent_model_input, t)

  # predict the noise residual
  with torch.no_grad():
    noise_pred = unet(latent_model_input, t, encoder_hidden_states=text_embeddings).sample

  # perform guidance
  noise_pred_uncond, noise_pred_text = noise_pred.chunk(2)
  noise_pred = noise_pred_uncond + guidance_scale * (noise_pred_text - noise_pred_uncond)

  # compute the previous noisy sample x_t -> x_t-1
  latents = scheduler.step(noise_pred, t, latents).prev_sample
  # scale and decode the image latents with vae
latents = 1 / 0.18215 * latents

with torch.no_grad():
  image = vae.decode(latents).sample
  image = (image / 2 + 0.5).clamp(0, 1)
image = image.detach().cpu().permute(0, 2, 3, 1).numpy()
images = (image * 255).round().astype("uint8")
pil_images = [Image.fromarray(image) for image in images]
本人水平有限,如果上文中关于diffusion过程有错误,还请斧正.
相关资料
- stable_diffusion.ipynb - Colaboratory (google.com)
- Diffusers.ipynb - Colaboratory (google.com)
- The Illustrated Stable Diffusion – Jay Alammar – Visualizing machine learning one concept at a time. (jalammar.github.io)
- rekilblog - A different way to look at Stable Diffusion (rekil156.github.io)
- What are Diffusion Models? | Lil'Log (lilianweng.github.io)
Comments NOTHING